Some Content Updates Could Not Be Downloaded From Our Servers

Windows
How to Solve: Warframe Launcher Update Failed on Windows 10
June 18, 2021 0 224
The "Update failed!" error message appears when launching the latest version of Warframe or downloading the latest update. This error can be caused by various reasons, such as damaged Microsoft Visual C++ Redistributable installation, Internet connection settings, Warframe launcher settings, missing DirectX installation, game cache, or malware.
The detailed error message looks like this:
Update failed!
Some content updates could not be downloaded from our servers.
Please restart Warframe to try again.
The update will be restarted shortly.
What Causes 'Update Failed' Error Message on Warframe

Several reasons can cause Warframe updates to fail. We've focused on the most common issues that users encounter regularly. Unfortunately, some things that have almost nothing to do with the game can cause it to fail, but everything can be easily fixed. Here's the full list:
- Incorrect installation of Microsoft Visual C++ Redistributable.
- Internet connection settings
- Warframe launcher settings
- Incorrect or missing DirectX installation
- Game cache
- Malicious programs running on your computer
How to Repair the "Update Failed" Error in Warframe

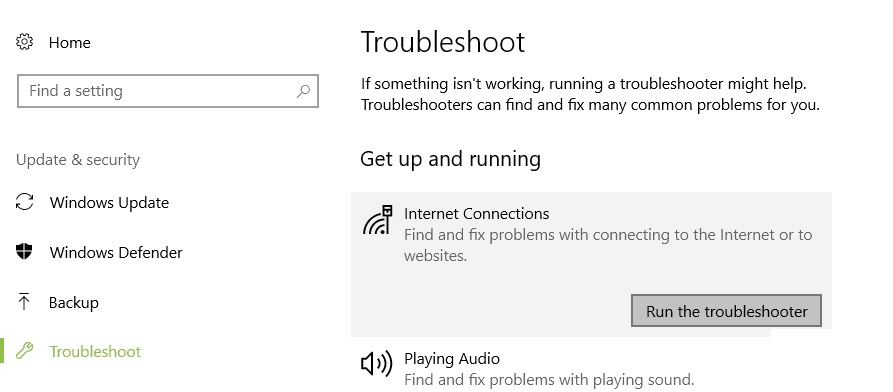
Run the online troubleshooter
This is one of the tools available in Windows 10 that checks for problems with your computer's network settings.
- Click on the Start button.
- Click on Settings.
- Click on Update and security.
- Click on Troubleshooting.
- Tap Advanced troubleshooting tools.
- Tap Internet Connections, then tap Run Troubleshooter.
- This will launch the troubleshooter.
- Follow any recommended steps that need to be performed.
Launch the game as an administrator
- Open the Steam launcher.
- Click the Library tab.
- Right-click Warframe, then select Properties.
- Click Local Files.
- Click Browse local files.
- Right-click the Warframe executable file, then select "Properties."
- Click the "Compatibility" tab.
- Select the Run this program as administrator checkbox, then click Apply and OK.
- After performing these steps, try to see if the problem persists.
Resetting local network settings
In some cases, the problem is related to a connection problem, especially if you have changed your connection settings.
- Press the Windows + R key combination.
- Type "control.exe" at the startup prompt and click OK to launch Control Panel.
- In the Control Panel, select "View as": Category in the upper right corner and click on Network and Internet to open this section. In this window, click on Internet Options.
- Click on the Connections tab and click on Local Area Network Settings.
- Check the Automatically Detect Settings box and make sure the proxies are blank unless you're actively using them, which isn't recommended unless you need other connection settings when playing Warframe.
- Make sure you apply the changes you've made and restart your computer.
- Check to see if the problem persists with the Warframe update.
Reinstall DirectX
- Go to the DirectX End-User Runtime Web Installer download page.
- Download the DirectX Web Installer to your computer.
- Run the DirectX installation by opening the downloaded .exe file. Follow all of the instructions in the DirectX installation wizard.
- Scroll down to the terms of use page (if you've read them, of course) and click Next.
- Reboot your computer.
Frequently Asked Questions
The installer requires administrator privileges to update the files on your computer. First, make sure that both Warframe and Steam are completely closed. Then restart Warframe as an administrator. If you're using Steam, run it as an administrator and run Warframe as usual through it.
On the Features screen, choose Settings -> [System Software Update]. Your system will automatically check to see if you have the latest version of the system software. If not, the latest update file will be downloaded to your system.
- Open the "Start" menu and find the Warframe (or Steam) shortcut.
- Right-click the shortcut and select Properties.
- Select the Compatibility tab.
- Click Change settings for all users.
- In the Permission level section, select the Run this program as an administrator check box.
- Click Apply.
- Fix your Microsoft Visual C++ redistributions.
- Reset your local network settings.
- Change some launcher settings.
- Reinstall DirectX.
- Unable to connect due to network errors.
- Run game launcher as administrator.
- Change the language via the launcher.
Some Content Updates Could Not Be Downloaded From Our Servers
Source: https://techquack.com/how-to-solve-warframe-launcher-update-failed-on-windows-10/
0 Response to "Some Content Updates Could Not Be Downloaded From Our Servers"
Post a Comment